Creating a Timed Entry Event
Timed Entry Event: An event over a single or multiple days that requires ticket buyers to have different admission times to the event (example: A Museum Pop-up where ticket buyers can only enter the museum at select times).
This article includes:
- Setting up a Timed Entry Event
- Bulk Edits
- Timed Entry Add Ons
- Overriding Price on Timed Entry Timeslots
- Updating Date/Times on Individual Orders
- Additional Considerations
Setting up a Timed Entry Event
To create a series or timed event, follow these steps. If you ever run into issues don't hesitate to reach out to your account manager
Step 1: Create the Basic Event
Begin by setting up your basic event outline, either the general series event, or the main event to which the timed entries gain access. Go through the process as normal. Once the outline is created you will proceed with the following additional steps:
Step 2: Shopping Cart Settings
Edit Event > Schedule / Access Points > Activity / Access Point Event Settings
Note: If you are having difficulty finding the "Schedule / Access Points" option as listed below, you may need additional permission settings on your account.
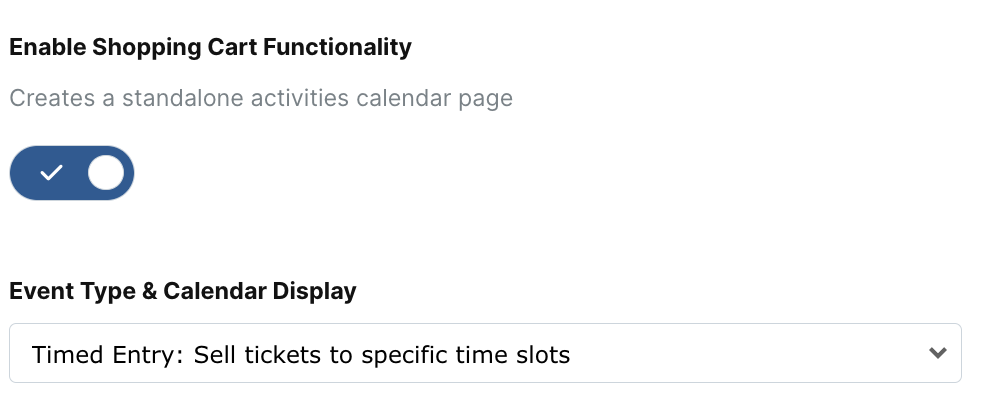
In the "Activity/Access Point Event Settings" section:
- Toggle on "Enable Shopping Cart Functionality": This will bring up several other options, which you can leave blank for now
- Change the "Event Type & Calendar Display" to be Timed Entry: Sell tickets to specific time slots
Scroll to the bottom of the page and hit "Save".
Optional Settings
- Activity Registration Timer Minutes
- Do not show sold out activity instances
- Turning on will hide the selection of the date or time for a selective registration event, if the date/time is sold out
- Display Cart Schedule Conflict Warnings
- Warn customers if items in their cart have scheduling conflicts, such as overlapping times or experiences scheduled on different days.
- Close Activity Registration at a Specified Time the Day Before
- At a time specified per activity on the day before, close activity instance registration so no further selective-registration tickets can be sold for it
- Display Activity Producer Instead of Location on Calendar
- Whether to display a calendar of events by activity producer instead of by location
- Activity Producers first need to be set up via Organization Businesses > Activity Producers > Add an Activity Producer
- Once added on the Organization Level, Activity producers can be added to individual access points/activities on an event. The activity producer will display on the event activity calendar and in downloadable reports.
- Add Additional Description & Details on Calendar Page
- Calendar Page Additional Description Title
- Calendar Page Additional Description Text
- Enable Flexible Check In (App)
- Allows a ticket registered to an access point to be checked in for any instance of that access point.
- Add Sold Out/Inactive Filter to Calendar
- Adds a checkbox which allows users to filter out access points with no available tickets.
Step 3: Create Tickets
Edit Tickets & Merch > Ticket Types > Create a Ticket Type
Make sure Ticket Types are created for each price point. The name can be the same (ie: General Admission) if offered for different time slots/multiple dates. If selling multiple types of access at the same price point, make sure to create a different ticket type for each.
Need help creating a ticket type?
Step 4: Event Event: Schedule / Access Points
Edit Event > Schedule/Access Points

- Add an Access Point
- Add an Access Point Name > Create & Add Details
- Fill out Short Description and/or Full Details
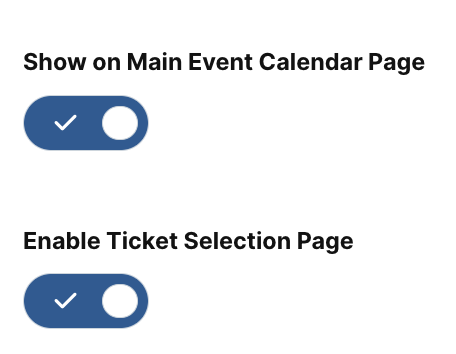
Review and confirm the Show on Main Event Calendar Page and Enable Ticket Selection Page settings are both enabled
- Type of Access Point: Timed Entry
- Edit Associated Ticket Types
- Click any Ticket Type that will apply to at least one time slot for the Access Point
- Click Save Details
- Create Access Point Dates, Times, Locations (Instances)
- Add a Start & End Date/Time for the time slot
- Set the Access Point Capacity
- For all tickets available for that time slot change Registration Type to Timed Entry - Click Add
- Change Date/Time/Location info for next time slot
- Change/double check the correct tickets have Timed Entry instead of “None” -> Click Add
- Repeat for all future time slots for this Access Point
- Save & Return to Access Point List
- Add next Access Point
For a video tutorial on the above steps, click here
Step 5: Finalize and Publish
You now are ready to publish your event as normal. Series/Timed Entry events have two main elements:
- Main Event Page: This page includes a schedule / activities list showing all your Dates / Access Point information:

- Access Point Page:
In this example, only tickets for 4/21 appear and then the customer can choose from available time slots and select their desired admission ticket for purchase

We improved the navigation between access points on timed entry events where if a customer has existing items in their cart and goes to a new timed entry activity page, we anchor the order to the first date in the cart so that the customer does not have to choose their date again.
Bulk Edits
We’ve added the ability to bulk edit access points and time slots for timed entry and auto registration events. On an individual access point, you can use our wizard to select time slots, make changes to the overall time slots, and edit available ticket types and associated settings.
- Step 1: Find Time Slots to Edit
- Step 2: Apply Changes to Selected Time Slots
- Step 3: Review & Submit


Timed Entry Add Ons (All Day Timeslots/Add Ons)
For timed entry events, we’ve now added support for all day add-ons where additional items can be sold on an “all day” time slot. When a specific date and time is selected, any matching “add on” time slots will also display ticket options. This allows additional experiences to be sold along individual time slots while not impacting individual time slot capacities.

Overriding Price on Timed Entry Timeslots
For timed entry events, we now support the ability to override prices on individual time slots. Previously, each price point needed to have its own ticket type and each ticket type needed to be sold on a specific time slot. Now, you only need to create a single ticket type for each type of item (ie, General Admission) and set a base price. On each individual time slot, you can override the base price to charge customers.
Edit Event > Schedule / Access Points > Select the Access Point > Scroll down to Instances > Click Notepad next to time slot > Scroll down to Ticket Types
- Enable "Override Base Price" > Update "Timeslot Price" > Save Details

Note: Overridden prices are not yet supported in the app
Updating Date/Times on Individual Orders
If a customer cannot make their original date or time that they purchased, it is possible to update the tickets to reflect a new date or time that works for them.
- Locate the order on your event via Manage Attendees > Orders > Search their name or email > Click on their name
- Scroll down to their tickets > Manage & Print > Edit Access Point Registrations

- De-select their current Date/Time and select the box next to a date/time that they can attend
- Click Save Changes at the bottom right then OK once the registration changes are reviewed upon the pop-up message

- You can then review their ticket type registrations on their order and it should reflect their new date/time

- Repeat these steps for every ticket on the order
Additional Considerations
Timed entry events are not compatible with:
- Sub-tickets (multi-price tickets)
- Ticket tier on sale settings (show when another type sells out)
- Linked tickets
- Gratuity
- Access codes
- Ticket groups
- Post-purchase registration
- Seating
- Event embeds (iFrame/Modal)
- Waitlist
**Some of these features will work on just the tickets page for a timed entry event and not the access point pages, but they are not recommended on timed entry events in general.
Use Cases
- Holiday Market, Pumpkin Patch, Holiday Lights
- Tours with multiple times per day across a period of time
- Meet and Greets with specific time slots
- Cruises
- An event with time slot specific needs i.e Ice Skating 1-2pm, 2-3pm, etc.
Advantages
- One event with many dates, times, and ticket offerings
- Flex Check-In: a feature that allows scanning tickets across multiple time slots on the same day without changing the time slot you're scanning for.